Blog Archive
Particles are a staple in computer graphics and game creation. They’re an easy way to create flames, smoke, explosions, sparks, splashes, weather, dust, and even abstract effects, such as the wispy, glowing trail behind a magic spell. These kinds of effects can set the atmosphere and mood of your game, make vehicles roar to life, bring excitement and visceral feedback to combat, and more. Now, with Custom Particles, you have the freedom to change the existing ROBLOX particle effects – and the power to build beautiful and creative effects of your own.
In particle systems, particles are 2D images (known as sprites) that continuously emit from a single source to create a fluid effect. ROBLOX has long had a stock supply of particle effects, including fire, smoke, and sparkles, but what you could do with them was limited to changing the colors, size, and intensity. Custom Particles adds a huge assortment of dials and knobs to the existing controls.
To get started with Custom Particles, you simply add a new type of object, the ParticleEmitter, to a part in ROBLOX Studio. One of the most exciting changes is that you can use one of ROBLOX’s particles or choose your own texture for the ParticleEmitter. (Yes, that does mean you can finally turn your favorite meme into a particle effect. Go ahead, get it out of your system. We’ll wait.) From there, you can adjust a bunch of new properties:
- Start and end color (this also tints custom textures)
- Light Emission (or “glow”)
- Transparency
- Size
- Rate (particles emitted per second)
- Speed
- Rotation and rotation speed
- Spread (the randomness of particle direction)
- Acceleration (apply forces to change particle direction in all three directions)
- Minimum and maximum lifetime of each particle
We’ve also included a visual “spline” editor for the size and transparency properties. This lets you adjust both these options by creating points on a graph – for instance, you can set the particles to be big when they first emit, shrink in the middle of their path, and then become large again before disappearing!
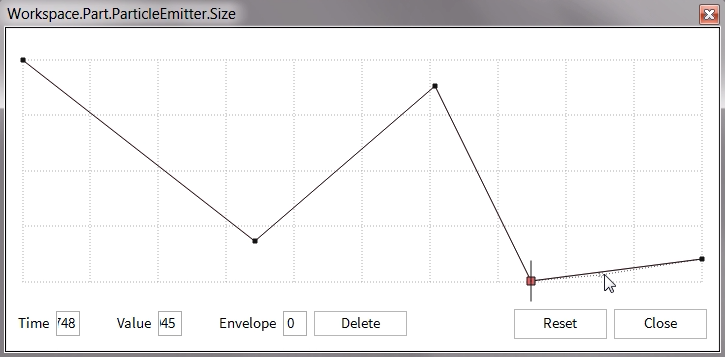
Using the “spline editor,” points on a graph change the particle system. In this example, the particles smoothly transition between big and small sizes before fading away.
With all of this freedom, you can spend hours and hours playing with particles and creating things we – and the entire ROBLOX community – have never before seen. This is emergent building, and one of the key reasons why Custom Particles is such a cool feature. There are going to be a lot of surprising effects to encounter on your journeys through ROBLOX!
For more technical documentation of how the new Custom Particle objects and properties work, we recommend you read through the feature’s ROBLOX Wiki entry. Laker “UristMcSparks” Sparks has also recorded a great beginner tutorial, in which he demonstrates how to manipulate and modify Custom Particles properties to achieve your desired effect. We’ve embedded the video here for your viewing pleasure, but you can find all our how-to videos on the ROBLOX YouTube channel.
We’ll be keeping a close eye out for eye-catching uses of Custom Particles over the next couple weeks. To help you show us your cool creation, make sure to share screenshots, GIFs, and Vines on social media (especially Instagram and Twitter) using the #ROBLOXdev hashtag! Go particle crazy – you might see your work featured in ROBLOX’s social media or a future blog post!