Blog Archive
Before adjourning for the holiday season, the entire ROBLOX team gathered for an afternoon of excitement and innovation in the form of Hack Week presentations. What is Hack Week? It’s an annual opportunity for our team to take nearly five full days and explore a visionary new idea or piece of technology. Needless to say, there were many impressive projects on display and, as always, we’ve picked a select few to share with you. Remember: there is no guarantee that any of these projects will transform into official features, but the possibility is there.
Arseny “zeuxcg” Kapoulkine
Light and shadow techniques
During this Hack Week I decided to explore various techniques for working with light and shadows. While our existing dynamic lighting system is a great foundation for lighting your games, there’s so much more we can do — both in terms of making existing content shine, and giving developers more tools to improve the way games look. To get there I had to explore a full gamut. What is possible with the existing systems? What kind of incremental improvements can we make to the voxel lighting system? Can we use voxel lighting for more scene elements? Are there alternative techniques that can complement it when voxel resolution is not enough? How do we improve lighting contrast?
While just one week is not enough time to nail down definite answers to all these questions, I believe I scratched the surface deeply enough to get all of us thinking. In the last two years we’ve come a long way in terms of picture quality, and we have more improvements lined up; but we still have a ways to go and we can, should, and will go there. You, as game creators, are an important part in making that happen — don’t hesitate to PM me (zeuxcg on roblox.com or developer.roblox.com) and let me know what parts of this demo would be essential for making your game look beautiful!
Max “maxvee” Volkov
Scripted particles
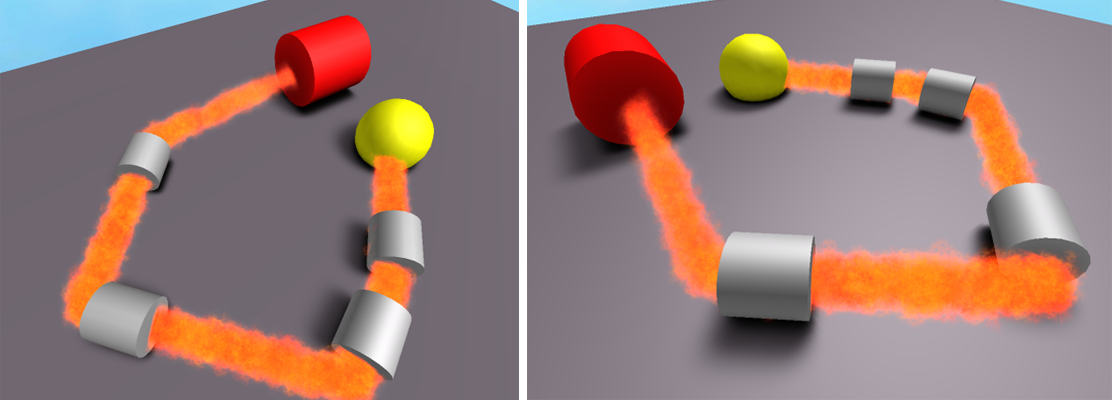
This is a fully functional particle system, in which every individual particle component (position, rotation, color, transparency, extras) is accessible from a Lua script.
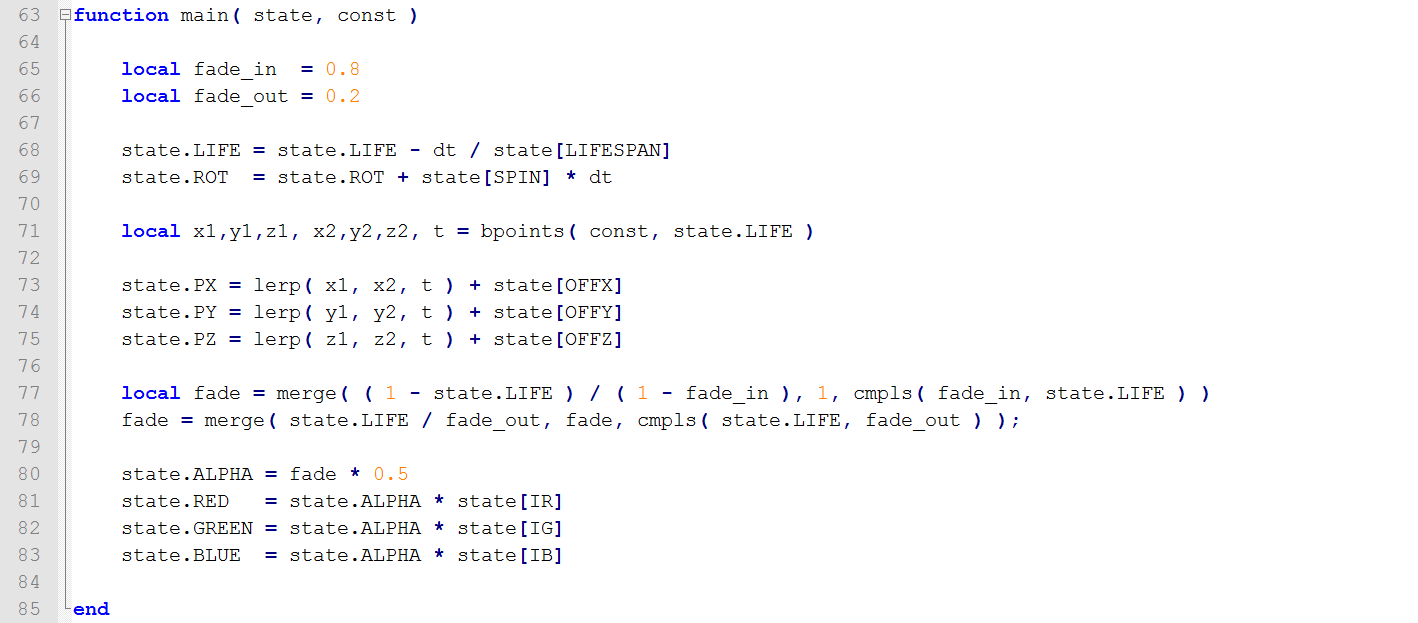
This example script runs for every particle every time the game renders a new frame, and recomputes positions and colors for it. You can make particles jump through hoops as is shown in this video. Notice how the particles changed size – I had adjusted the script to produce bigger particles and the system immediately picked up the updated function.
Performance considerations were pretty much the critical part of this project, because iLua VM overhead is very high.
In the heart of this new particle engine lies a separate Lua VM with clever bindings that allow you to invoke operators (such as +,-,*,/) and functions on arrays instead of scalars. So, even if, for example, you have 2,000 particles in the system (as seen here), the script function is invoked only once per frame, but variables like:
state.PX = state.PX + 1;
are actually long arrays, each of which contains the given element (i.e., position X component) from every single particle. Internally, the underlying C++ module will perform 2,000 additions or multiplications in a very tight loop that contains nothing but the operations to perform (i.e., only useful work, no book-keeping overhead normally inherent to Lua VM) and with a very performance-friendly sequential memory access pattern.
Jason “jmargh” Roth
Bindable hotkeys
I spent the week working on an in-game key rebinding system that would work for all ROBLOX games. This would allow players to change the keys they use to move their characters or perform special in-game actions. For a prototype version, I hooked into our ContextActionService API, which developers can use to bind keys, touch gestures or other input types to actions. The cool thing about it is that if a developer used the ContextActionService to bind an action to a key, this system would catch that, and create a menu option to change it. So if a game set the “opening a door” action to the key E, this would let players change it to another key. In the linked video, I created a custom action that sets the players head on fire by pressing the F key. The system catches that, along with all the other actions like movement, shift lock and jumping, and creates a menu to let players change the actions to whatever they prefer.
Vince “CodeWriter” D’Amelio
Spawn and character attach points
I first added some features to the SpawnPoint system to make it easier to use. With some small changes to the respawn code, I made it so characters will use the direction of the SpawnPoint object when they spawn. This makes it easier for developers to point players toward the action as they enter a game. I also added an extra parameter to Players to allow developers to specify an exact SpawnPoint to use the next time a character dies. This can be used to easily create checkpoints in obbys or to allow characters to pick a specific point to return to the game.
The second feature I worked on this year was the sizing and placement of accessories that ROBLOX characters wear. Currently, all accessories are hats and these hats always sit in the same place on a character’s head and are the same size, regardless of what shape or size the character’s head is. This causes problems if a character’s head is larger or smaller than normal, as the hat will clip through the head or seem to float above it. These problems are even worse if the accessory is something that normally isn’t a hat, such as shoulder pads, wings or a belt. To solve these issues, I added a property to accessories to indicate where on the body they should attach, such as head, shoulder, chest or even feet. Then I added additional information to the body parts to mark where each body location is for that part and what size the attached accessory should be. This allows hats to scale appropriately for large character heads and to position objects like gloves or shoes on the correct body part in the right position.
Val “Khanovich” Gorbunov
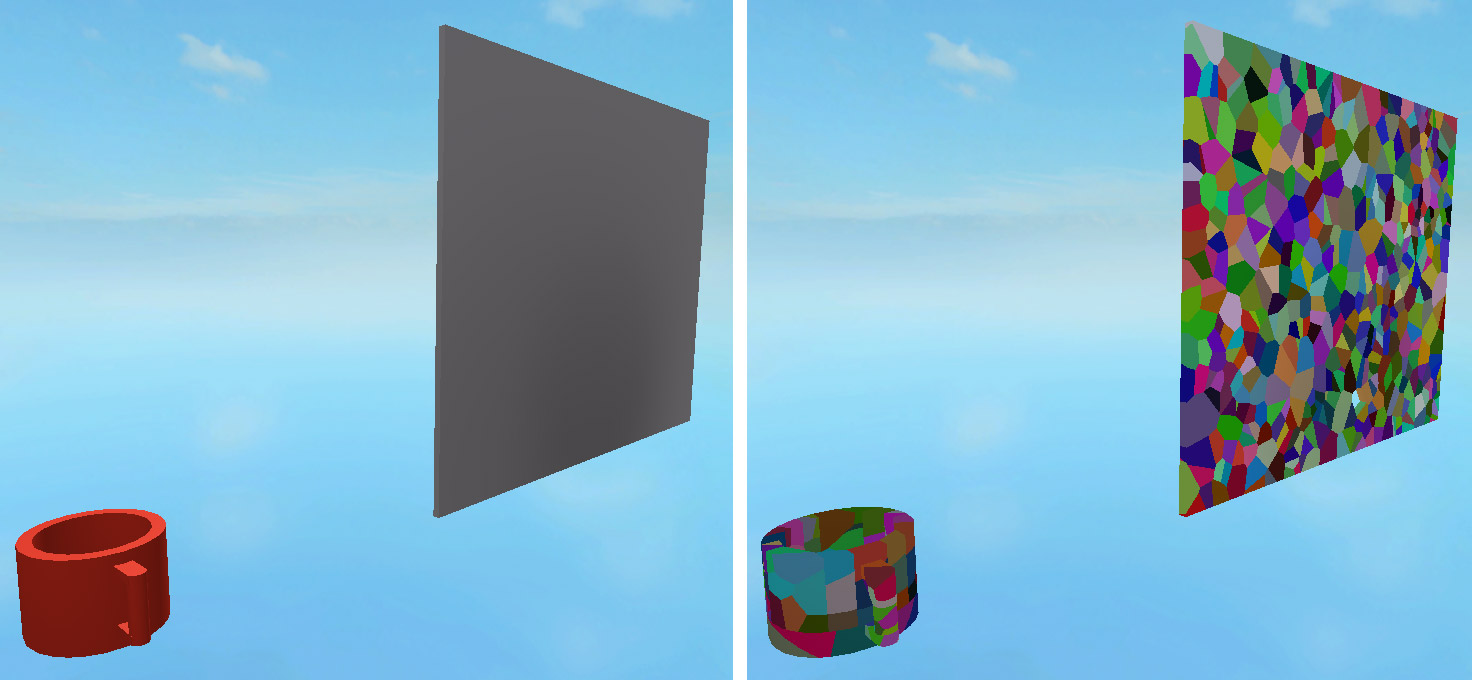
Solid modeling fracturing
Warning: the following demo video shows little to no work in terms of the rendering. My focus was working on the physics and I simply made sure that the display for individual shards worked — not that it worked correctly.
As an engineer who worked on the Solid Modeling Physics project, I was curious to see what other kind of additions we could make to the Solid Modeling tool set. Since Solid Modeling has a high focus on creative building, I thought to introduce a little bit of destruction into the mix. At first I attempted to find a way to break an entire shape apart all at once, but quickly ran into dead ends. After talking to one of our technical directors, I decided to leverage the fact that Solid Modeling objects are already sub-divided into smaller Convex objects in the physics world and to simply slice those objects up into smaller shards using random planes. The result is quite fun when combined with a large metal ball that is hung by a chain. Thanks to Quenty for providing some of the demo material.
Michal “ConvexRumbler” Benatsky
Webcam smile and wink detection
ROBLOX is a social game, so I was curious as to how possible it would be to transfer players’ emotions to their avatars. I decided to try transferring facial expressions to a ROBLOX character, and see how far I could get in a week. To experiment with this, I used a webcam because, well, what else would I use? I am not an expert in computer vision, so I also decided to use openCV, a computer vision library that is an amazing help with computer vision problems. I’m using Haar cascade classifiers to detect the face, smile and eyes, so ROBLOX can know whether you are there, whether you are winking, and how much you are smiling. Then, I display this on your ROBLOX character. I considered trying to track hands to make your avatar wave or dance if you do so in real life, but didn’t have time. However, it is possible!
Fun fact: this is Hack Week, so the functionality really is hacked in: the interprocess communication (face detection program to ROBLOX) is done using the clipboard (copy/paste)!
We hope you find these Hack Week projects to be as exciting and entertaining as we do. As always, let us know what ideas you love the most!