Blog Archive
Today, we launched our revamped particle effect system and a new look for the existing particle effects: smoke, fire, sparkles, and the spawn forcefield. All of these particle effects were completely redesigned from the ground up to fit the high-quality and high-definition look that we’re working hard to bring to ROBLOX, and several key members of the Rendering and Art teams collaborated to redefine what ROBLOX particle effects are. It was important to us to ensure that implementing these effects in Studio is the exact same process as it always has been, which it is. As Senior Software Engineer at ROBLOX, I want to share an under-the-hood look at the technology we developed to implement the new particle effects, and talk about an interesting challenge we overcame in the process. Get ready for a deep dive.
Particles!
When we shipped our new 3D graphics engine earlier this year, one thing we had to do was to migrate the existing particle effects (fire, smoke, sparkles, forcefield, and explosion) from Ogre3D to our new engine. We chose not to preserve the Ogre3D’s particle implementation, but instead develop our own. While not as flexible as Ogre’s, we have effectively traded that “universal flexibility” for raw performance. The tech has been there for a while, but recently we’ve substantially updated it to make these new particle effects possible.
So, what are particles in ROBLOX? Our particles are simple quads that are rendered always facing the camera. Although the particles are essentially flat, they exist in the 3D scene and still abide by the rules (e.g., they can still be obscured by level geometry).
Our awesome tech
Internally, all five effects are implemented using the same particle engine. It was designed from the ground up to be able to process lots of particles in a very tight loop – the key to its performance. Internally, each particle emitter has a fixed set of parameters that define each particle’s behavior (lifetime, initial speed and rotation, acceleration, spin, growth, air resistance, etc.) and appearance (colors and textures).
Particles are organized into emitters. Each emitter spawns particles at a given rate. Then initial parameters are applied and the emitter computes positions and rotations of all particles and fills out the vertex buffer, before uploading to the graphics card. The rest (orienting quads to face the camera/dealing with colors/textures and transparencies) is done on the GPU.
For performance, we have a system-wide cap of 16,000 simultaneous particles on screen; however, emitters that are further away emit fewer particles and stop emitting at all at a certain distance. There’s also a system that throttles particle emission based on the current frame rate. Finally, emitters don’t do anything at all (they don’t even move their particles) if they are outside your view. (So if a particle spawns in the woods…)
Let’s talk a bit about how we deal with particle appearance.
Rendering the particles
Each particle essentially has its texture, color, and transparency. Transparency comes in two flavors: an alpha channel in its texture (i.e., per-pixel transparency) and the overall transparency for crossfading and blending. There’s also implicit background (the objects behind the particle system in the 3D scene) that the particle has to blend against in several different ways.
We also wanted to control the particle color and transparency over its lifetime (e.g., it starts red, then shifts to green, then to blue, then gradually fades away), because very early it became clear that interpolating between just two colors and two alphas is too limiting.
The solution? More textures!
Each particle emitter gets a bunch of additional parameters; among them are a color strip and an alpha strip. These are two textures that define each particle’s color and transparency (respectively) over its lifetime. These textures are 2D. We utilize the second dimension to our further advantage: each particle upon spawn randomly picks a horizontal line on those textures that it will travel along (left to right) during its lifetime. (It’s not allowed to skip to a different line, so you may call this each particle’s “destiny” or “fate.”) Thus, having different colors on different texture lines helps to create color variations for particles, so that the effects aren’t monochromatic.
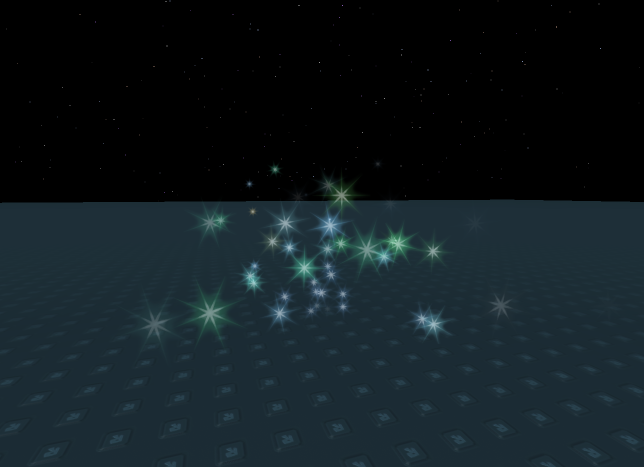
Sparkles are probably the best example here. Significant color variations are exactly what makes the sparkles shimmer and quickly change colors. As for alpha, the gradients in the beginning and at the end make the particles fade in and out gradually instead of just popping.
Armed with these techniques, we gave the tech to our artists to play and let them design the new looks. There were many challenges, but there’s one I’d like to share because it might be useful to our fellow video game developers out there.
The woes of alpha blending
Initially, our artist came up with a very good looking fire design that involved additive blending. Our early design looked like this.
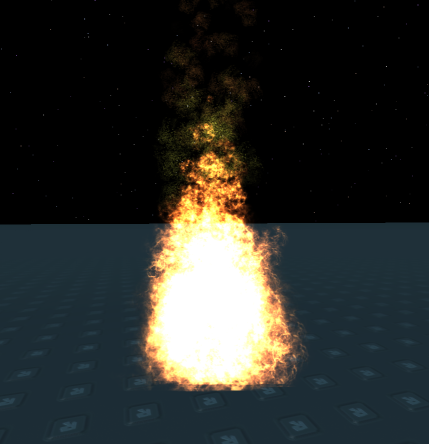
Looks great, right? With a very hot middle, and dark orange sides — a truly realistic ball of fire.
Unfortunately we found that incredibly bright fire doesn’t work well against bright backgrounds, as you can tell by the following image:
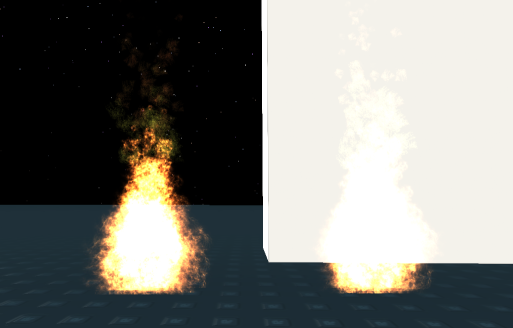
For the same reason, early designs looked awful on item thumbnails during internal testing, too – because essentially, what you get is:
white + color = white
So we came up with a blending trick, and decided to make a hybrid blend, which consists of additive blends and normal alpha blends. Deeper down the rabbit hole we go.
The usual blending equation is:
pixel_color =* *
With source_color being the output of the pixel shader, dest_color being the contents of the frame buffer of the background we’re blending against, factors can be set to fixed numbers or taken from colors, and “op” is the operation to perform, also known as addition or multiplication
For additive blending it’s simply:
pixel_color = (1 * source_color + 1 * dest_color)
While for normal alpha blend it’s:
pixel_color = (source_alpha * source_color + (1-source_alpha) * dest_color)
So, in order to combine the two, we can precompute and output:
source_color.rgb = (particle_alpha * particle_color.rgb)
from the pixel shader and set the 1.0 as source factor (the so-called “premultiplied alpha”). For the second part though, we merely multiply the required blend ratio (0…1, i.e., how much additive vs. normal) by the particle transparency and return it as the alpha channel from the pixel shader, then set the dest_factor to be (1 – source_alpha).
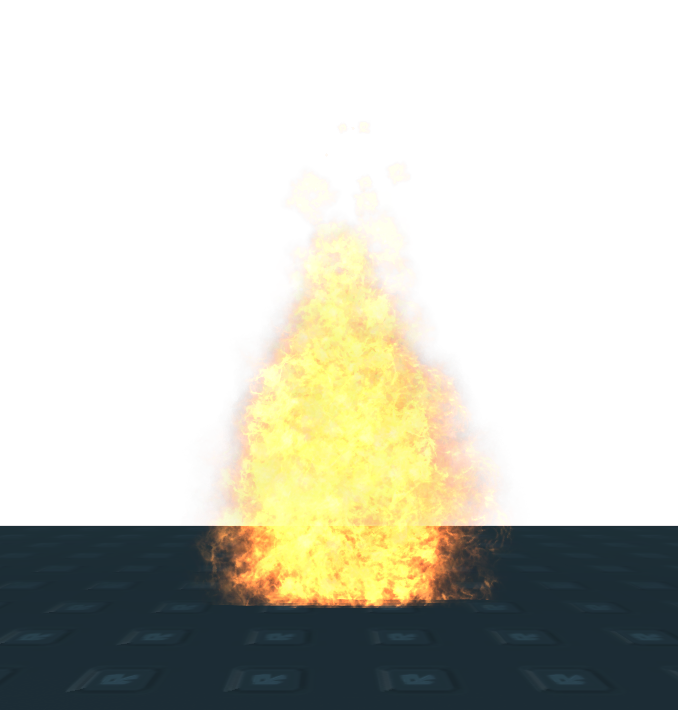
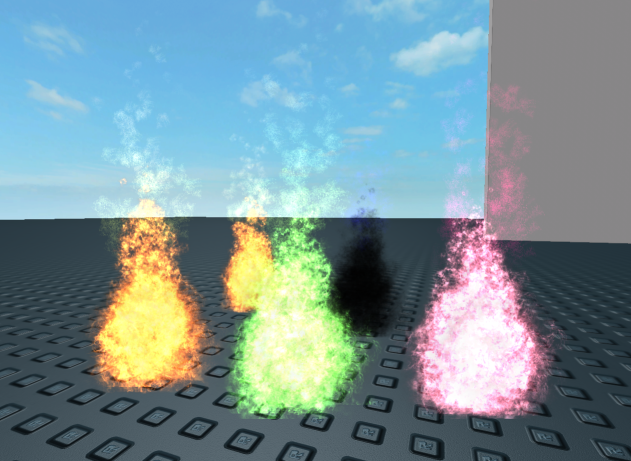
The result is that although the fire is not as blown-up-white-hot as the original design, it does blend very well even against even the most ridiculous backgrounds, which you can see in this image:
Other changes
How fire colors work has also been tweaked a bit. The new fire uses the primary color property for the flame and then secondary color for those tiny sparks that you can see coming off the top, as seen in this image:
Your spawn forcefield is now entirely a particle effect. Even the sphere around the character – it’s just a particle system that spawns several circles on top of the character and offsets the particles toward the camera a little bit so that the particles appear on top of the character.
We’ll deal with explosions in a separate update that is soon to follow; currently it remains “programmer’s art” by yours truly, but it’s being reworked as I’m writing this. Also we’re likely going to repaint the forcefield texture a little bit (but don’t expect anything drastic, at least for now).
You can start playing with the new particle effects right now in ROBLOX Studio. Enjoy.